 So....how much does it cost to make a movie? Well, that's all relative. It depends on quite a few things: your budget, production needs, your budget, post-production needs, your budget, distribution and exhibition goals, your budget, and most important of all....your budget. Wait I wrote "your budget" how many times? Believe me when I tell you it wasn't a typo (shocking, right?). Let me put it this way. You have direct control over how much your movie is going to cost. It's not like there is some magical formula out there on Pinterest that can show you how to calculate any of this. You decide how much it costs and you control the expeditures. Of course, this is if you are the independent filmmaker. If you're working for someone else, then obviously they have a say in how the budget will be structured. Don't fall into the myth that good movies take a lot of money. Sure if you want to have all studio-grade equipment, A-list actors, tons of Special FX, elaborate costumes, and etc., then yeah....you're going to be looking at a few million. However, you can make a fantastic movie on a shoestring budget. My first feature-length documentary, for example, cost just under $13,000. That doesn't even pay for craft services on a Hollywood blockbuster film. I know guys that have done it for less and I know others who have done it for nothing. It all depends on how organized, resourceful, and skilled you are. The first thing you do before you do anything else is work out a budget for your movie. You need to aim high and then try to undercut yourself by saving money where possible. You want to aim high as a measure of "preparing for the worst" should you need to purchase everything on your list. So, don't be afraid to inflate the figures a bit, but then when it comes to making actual purchases or paying for services, try to save money where possible so that you don't risk your movie running with a deficit. Plan big, start small.  You can search online for budget templates that can help you get started if needed. But one thing is for sure.....you must be dedicated and headstrong in keeping this budget to the penny. You can't just play this off like a New Year's resolution filled with good intentions of making promises (and then not keeping them). You really must be responsible and stalwart in your budget so that you don't jeopardize the success of your film. Remember back in the other post about getting started where I mentioned that most businesses fail because of poor planning, debt, or unable to manage finances? BINGO! You don't want to be one of those guys that starts something great and then declares bankruptcy 6 months later because you can't keep a budget. How embarrassing, right? You created your empire and you want it to stay around for a long time. Unfortunately, money is the sole element that can bring your movie or your business to it's knees. Don't make the horrible mistake of letting things get out of hand.
In order to formulate a good budget, you need to do some cost research and analysis. Get on the Internet and scope out equipment that you need to buy. Scout out people as potential help. Talk to other filmmakers about what their experiences have been. Go window shopping to price mundane things you might need. Be meticulous in note taking -writing down how much an item is and where it is being sold. It is a good idea to do this several months ahead of your filming schedule so that you can watch for sales or free shipping promos. Doing good research pays off big when planning your budget. Just hold yourself to it at all COSTS!
0 Comments
 So… audio. Gosh, this is a can of worms. Audio can either make or break your project. You could shoot the most wonderful video footage with stunning scenes comprised of the most beautiful lighting or special effects, but if your audio sounds like you recorded with a cassette tape recorder circa 1983, you are in very, very,……..very bad shape. There is absolutely nothing you can do to fix badly recorded audio. No software in the world and no sound engineer in the world can fully repair poor audio. Images make up half of your movie. Audio makes up the other half. Both work in tandem to create the artistry you hope to achieve. You cannot have a good film if one of these two elements is lacking. “So, the built-in mic on my camera isn't good enough?”, you might ask? Absolutely not. If you want all your dialog to sound like monkey poo, then fine, go ahead. Otherwise you are going to have to invest in some additional resources to get that high-quality, professional sound that people expect to hear. 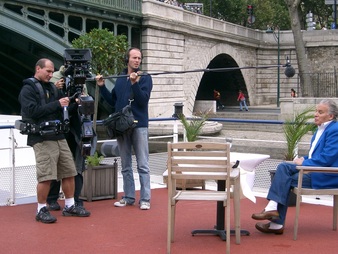 You have probably seen behind-the-scenes movie footage of someone next to the camera holding a long pole with a microphone attached to it. Why does the dialogue in movies sound so good? Because of that guy right there. He is pointing a highly-sensitive, directional microphone right at the chest (That’s right….you never point mics at people’s mouths. You point them at the chest.) of the actors to capture what you hear on screen. Sure an audio engineer will sweeten things later in post-production, but this guy (called a “Boom Operator”) has one of the most important jobs on the set. If recording good audio for major blockbuster movies is imperatively essential, then your small-time operation better follow suit. Audio will help distinguish your videos from others whose audio quality appears very poor and amateur. Plus people will appreciate the extra time you put in before filming to make sure audio levels are good and that there are no unwanted background noises. Keep in mind that high quality microphones are much more sensitive than your ear and therefore hear things that you do not. This is why it is essential to have a good set of headphones with you so that you can listen to the environment as well as to the dialogue. To help you get started, here is a rundown.
Since you will most likely be recording audio to an external source, this means that you will have to sync your audio and video together in your video editing software program. This can be a painstaking process, but a vital one nonetheless. People will find it distracting, comical, and frustrating if you don’t have your audio track properly synced with your video track. This is very unprofessional and just a big “No-No” that you must avoid at all costs. There is software available that can sync your two files together, but none should be trusted completely. It is also best to manually check and not just assume that the software got everything right. Me, I always go for manual syncing. 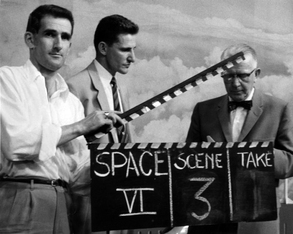 Now, there is a good/easy way to go about syncing and there is a bad/hard way of going about syncing. If you want to go the easy route then it takes just a teeny, tiny step during filming to make a ginormous difference in syncing. You’ve all seen the guy who holds a slate in front of the camera just before filming. He often says something like “Scene 5, Take 8” and then claps the slate together. Well, the slate performs two functions. One, the slate identifies the Take so that during editing you can easily identify which footage you want to use AND the actual clapping noise that the slate makes serves as an audio marker!! Holy Cow!! Amazing isn’t it?! So, all you have to do is match up the audio clap with the video frame where the slate comes together and…..VIOLA!! Tracks synced!! Easy as pie. Then just watch the rest of your footage (especially towards the end) to double check that everything looks right. Pay attention to people when they say letters like f, m, v, p, b…any sound where the mouth closes since the sound and action of the mouth is more recognizable. Slates can be bought pretty cheap and make a world of difference during editing. If you don’t have a slate, or forgot to bring it with you on a shoot, then just use your hands. Stand perpendicular in front of the camera, extend your arms out in front of you and give a big clapping motion by moving your arms. Make sure your hands can be seen by the camera. This serves the same purpose as the slate for creating an audio marker. Then, go through the same process in your editing software for syncing the tracks together. If you fail to do an audio marker while filming…….then I’m sorry. There’s no easy way to say it, but you are going to have one heck of an experience trying to get the tracks lines up correctly. Use the method explained above in looking at letters people pronounce. You may also be able to find a sound effect somewhere in your audio footage that could serve as an audio marker. Something like someone putting a glass on a countertop or a balloon popping. Matching an abrupt sound with a very precise action in the video will help you in this regard. However, it is going to be painstakingly time-consuming. So be warned and be prepared! 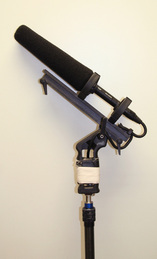 Please note that when syncing audio and video tracks together, it is best to zoom in on your timeline so that the time increments change to individual frames (you might have to zoom in a few times to get there). That way, you can make the smallest adjustments possible to get the tracks lined up as perfectly as possible. Depending on the program you are using, you might have to change the actual settings in your project to display frames instead of time. Most programs change automatically once you have zoomed in far enough.
Next to your camera, good audio equipment should be your most important investment. Please see the accompanying post for Audio Formats which will give insights into which formats will give you the highest quality, which are compressed and uncompressed, and which are universally accepted by most software programs as well as DVD players.  So…lighting. Good lighting is absolutely essential if you want to record good images. Think of when you go to have your adorable family photo taken at the local J.C. Penney or Sears. Yeah…all those lights are there for a purpose. If you have bad lighting, you will have bad image quality. It’s that simple. No video editing software on the planet can help you compensate for bad lighting –even RAW cameras that capture incredible detail cannot fully compensate for bad lighting mistakes. What kinds of lights do you need and how many? Well, that’s really up to your Director of Photography (or you -if you are doing everything yourself). There are a few different kinds of lights to choose from and they each have their own benefits. Tungsten Lighting: These are typically halogen lighting systems that are super bright and are hot (both temperature and exposure). You usually have to use Tungsten lighting with reflectors and diffusers to minimize or soften the amount of light needed on the scene. These lights create a warmer look on camera –usually creating a yellowish hue which you have to compensate for with white-balance. LED Lighting: These are also super bright, but do not get temperature hot. LED is also low-wattage whereas Tungsten is very power hungry. But don’t let that fool you. LED lighting can be just as blinding. These lights create a very cool look (almost sterile) and create a bluish hue that you will need to compensate for with white-balance. LED light intensity can also be controlled with dimmer knobs usually built onto the module. This is incredibly helpful and decreases the need for reflectors and diffusers. You can also place gels across them to help with saturation. A bit pricey, but well-worth the investment. CFL Lighting: On a cheaper budget, these work ok. However, CFL bulbs have a warm up time. When you first turn them on, they are dim. After several minutes they finally reach their full capacity. Because of that, you will want to make sure all lights on set are turned on at least 15 minutes prior to shooting. A big drawback is that if the temperature at the location suddenly drops (cool breeze or A/C), the lighting will dim until the bulbs warm back up. Fluorescent Lighting: Also a cheaper alternative to Tungsten and LED. Beware of flicker on camera from fluorescent lighting. You may have to adjust your camera’s frame rate to eliminate the flicker if it appears. 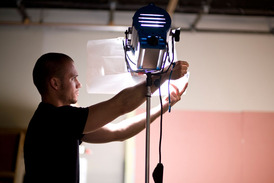 How do you set up good lighting? Basically, you want to follow the fundamental 3-point lighting technique and then expand from there as necessary. If nothing else, you want your Talent and the objects they interact with to be well-lit and look good on camera. Everything else is secondary to that priority. The 3-point lighting rule is made up of 3 lights that serve different purposes.
The camera is always placed in between the Key Light and the Fill Light. If you are using a backdrop, be sure to place the subject far enough away from the backdrop so that you don't get hard shadows. Once you have lit your subject well, then you can take a look at what else in the scene needs brightened. Is the background behind the subject too dark? Does a piece of furniture look like a black or brown blob in the background? Background lighting should always be subtle. Placing too much light on a non-essential object will create a distraction for viewers. Keep in mind that our eyes tend to focus on things that are bright. Lighting a scene takes time and a whole lot of patience. Scene Blocking is essential in order to figure out beforehand where your light needs to come from. If you’re filming on a soundstage, you will have to provide all light sources. If filming on location, you will most likely have the sun as a resource –but do not expect the sun and clouds to cooperate the day of your shoot. Always have backup lighting on hand just in case it’s overcast or stormy. 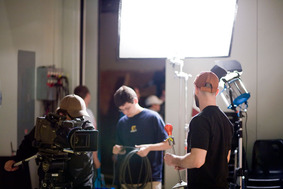 Once you get the lighting set, it is good practice before filming to study the image on the camera. You want to look for a few things that may be causing problems. Things that take a well-trained eye to detect. Some things like lens flares are obvious, but sometimes a light source can be reflecting off an object in a way that creates a hot spot in the image. You don’t tend to notice these -which is why you need to carefully study the image on your camera or an external monitor to see them. Things like lights reflecting off mirrors or glass are usually noticeable, but flat surfaces or objects at just the right angle can create unwanted reflections as well. Reposition the light, use a diffuser or reflector, or adjust the intensity to correct the problem.
You also need to pay heavy attention to shadows. Where are they? Are they causing an unwanted distraction? Do you get weird shadows as the Talent acts on scene? Are people or objects casting strange shadows on walls or floors? Just as important as it is to light a scene properly, you also need to control the darkness –which helps create depth-of-field and makes people/objects appear more 3-dimensional on screen. If your camera is moving during the scene, do test shots to make sure that as your camera angle changes, the lighting doesn’t create issues from other positions. If using multiple cameras, study the images from all of them to make sure that the lighting is even and issue-free. (Multi-camera filming is covered in another post.) Taking the time to get the lighting right will pay off in a big way. It will produce better image quality and your videos will have that professional feel to them. You again need to ask yourself the question “What kind of filmmaker do I want to be?” in order to decide what lights (and how many) will work for you.  So.....if you are like most beginning filmmakers, you may be overwhelmed by the amount of equipment that you need to purchase and….the cost. No lies, video equipment is expensive. Why? Because you get what you pay for. Do you want your camera to have control over exposure, saturation, audio levels, frame rate, aspect ratio, white balance, and focusing? Do you want better control of your lighting? Do you want sturdy tripods and rigs? Do you want audio equipment that is dependable? Do you want editing software that will produce the kind of content you wish to create? Then as sure as heck, you will have to spend money to get them. I suggest doing extensive research online looking at reviews and reading forums about the equipment you plan to purchase. Learn the pro and cons and be prepared to deal with the cons if you purchase the product. This is especially critical when looking at video editing software. Most high-end software (like Adobe CC or AVID) requires a beefy computer to handle all the processing and graphics. Software is covered in a different post. The first thing you need to look at is a camera. There are several types of video cameras available and they all have different functions. Again, this is where you need to stop and ask yourself: “What kind of filmmaker do I want to be?” Knowing what you want to do will determine what kind of camera you will most likely need. 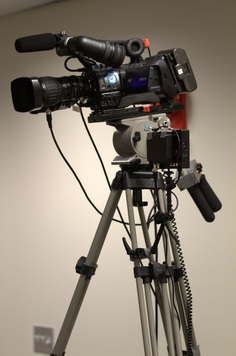 Digital Video Cameras are grouped into the following categories. (Some sources argue that there are more than just these, but whatever.) Amateur: Smart phones, tablets, webcams. Not suitable for serious/professional filmmaking. Consumer: These include your normal run of the mill camcorders like the Sony Handycam, Canon Vixia, Panasonic V550, and etc. These types of cameras generally do not give you much control (if any) over exposure, focusing, audio, frame rate, aspect ratio, and saturation. They generally cost between $300-$600. More money means you can buy more controllable features. Are these recommended for filmmakers? Ummm…….no. Prosumer: These are hybrid cameras that are more-or-less an affordable crossover between professional-grade equipment and consumer-grade equipment. These include cameras such as Sony NEX-VG30, Canon XA20, JVC GY-HM150, Blackmagic Cinema, and etc. These cameras will give you control over most everything. Most models allow for interchangeable lenses and XLR audio inputs. They generally cost between $1000-$2000. These cameras are recommended for beginning filmmakers. These cameras are nice enough that you could film actual movie footage with them. They offer great image quality, full HD, and can do pretty much everything that you will need them to. Professional: If you are absolutely serious and have the financial fortitude to afford these beasts, then go for it. These cameras give you complete control over everything and will give you the utmost in picture quality. These are cameras used in broadcast studios, movie sets, sports events, and etc. Be prepared to spend anywhere from $20,000 to over $100,000 for these monsters. Some will obviously require additional equipment to make them functional. But there are models you can get that have everything you need packed into the camera itself. Again, if you have the budget, go ahead and get one or a few. You won’t be disappointed with the images!! Full-Sensor and RAW: These cameras are actually considered Prosumer devices, but have special capabilities that their counterparts don’t have -principally a full 35mm sensor. What does that mean? Well…(cough)…size does matter. The bigger the sensor your camera has, the better images it can produce. Cameras with a full 35mm sensor will give you images equivalent to 35mm film. RAW cameras give you absolute, unlimited control over picture quality. Yeah….that’s awesome. They range from $4000-$20,000, but make a worthwhile investment if you want to be a serious filmmaker. These cameras include the Sony FS100 and FS700, Blackmagic Cinema 4K, RED, and etc. DSLR: Now this is where great filmmaking gets cheap! DSLR stands for “Digital Single Lens Reflex”. You can Google that phrase to learn more about what it means. The explanation is too long to post here. These cameras are principally designed for photography first and foremost, but have the capability to record incredible HD video. DSLR filmmaking has revolutionized the filmmaking industry. There are many models available from Canon, Sony, Nikon, and Panasonic that have this capability. All have interchangeable lenses which provide for unlimited flexibility in creating depth-of-field. However, they have major limitations –like virtually no control over audio levels (some don’t even have audio inputs), and they are all limited to a 12-15 minute record time. This isn’t ideal if you need to film long continuous shots like an interview, concert, and etc. These cameras typically cost around $600-$800 for good entry-level models and can go as high as $6000. However, be aware that most models do not come with lenses. If they do come with a lens, it generally isn’t a very good one. You typically have to purchase lenses separately….and they’re not cheap. You will also need to purchase an external audio recorder and microphone to capture high-fidelity sound. Lenses and audio are covered in another post.  Obviously purchasing a camera with lots of control, flexibility, and features will give you the better image, but consider what you will be filming. If you are just filming commercials for local television or websites, then you probably don’t need Professional-grade or Full-Sensor cameras. A Prosumer or DSLR device would be exceptional in that area. If you want to produce documentaries and features films, then you need to look above those.
So, ask yourself: “What will I be filming and what camera will give me the functionality that I need for that purpose?” Having said that, don’t purchase a camera that is going to create limitations either immediately or down the road. Remember to keep your business plan in mind and think of future needs. |


Categories
All
Archives |
 RSS Feed
