 So….let’s talk about framing. What is framing? Well, let’s go back to that family portrait from J.C. Penney that we talked about in a previous post about lighting. Pretend that the photographer actually took a decent picture. So, you decide to frame it and hang it up in your living room for everyone to see. Ok…that doesn't really have anything to do with camera framing. Framing is all about the “Rule of Thirds”. If you abide by this simple concept, you will never go wrong. Many amateur or inexperienced filmmakers make the big mistake of centering the subject directly in the middle of the screen. Makes sense right? Keeps things symmetrical with plenty of room on all four sides of it, right? Ummmm…..wrong. Why? It’s boring and in some cases, problematic. That’s why. Unless you want all your films to look like DMV photos or your 8th grade school picture, you should offset the image that your camera is seeing to coincide with any action taking place or the direction that emphasis or action is coming from. 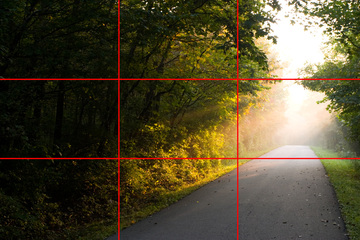 Take the image in the picture here, for example. See how it is offset? The road is not placed directly in the center of the shot. It is placed to the side which makes the image more pleasing to look at. The red lines running across the image seen here depict the Rule of Thirds. Wait! It’s a Tic-Tac-Toe board! Yeah….but don’t call it that unless you want to see eyes roll in disgust. Simply, where the lines intersect is where you should frame the subject. Generally, you should always position people in the upper-left or upper-right quadrants where those lines intersect. If you are doing a landscape, then position the main object of interest to one side –typically towards the side that has the lesser amount of light or the side that doesn’t have any action…like the back of a person’s head.  In order to keep framing consistent if having to shoot multiple takes of a scene, you should put Marks where your talent needs to stand, where the object needs to be placed, or where the camera needs to stop moving. This will get rid of any guess work and make filming go much smoother. That way your actors don’t keep standing or moving in different places and you don’t have to keep guessing where to frame the shot. Remember that several key elements are working together to create your artistic vision. You have the lighting which sets the look and feel of the shot, you have the camera angle which provides perspective within the scene, and you have the framing which is what the camera will actually, physically capture. If your framing is off, the lighting may not look right or you may have to adjust the camera angle. This is why Marks are so important in regards to framing. Keeping movement or position consistent will lessen the chances of a continuity error occurring or the lighting and camera angle getting off. Remember that you cannot really adjust framing during editing. You can make subtle changes in position or even zoom in a little, but there are limits on what you can accomplish. It is best to set up the shot and frame while Blocking a scene. Once the right camera angle has been found and the lighting adjusted for that position, place a Mark on the floor for the talent to remember the position and also mark any camera movements so everything stays consistent and fluid throughout filming –especially when filming multiple takes of the same scene. To help you, most prosumer, DSLR, Full Senor, and Professional video cameras have built in overlays that will show the Rule of Thirds grid on the camera monitor. This will help you frame your shots better and keep talent where they are supposed to be on screen during camera movement. In addition, if you can connect your camera to an external monitor, these monitors generally have the ability to place the grid over the image. Don’t worry, whether you have the grid displayed on your camera or an external monitor, it will not actually be recorded. Now, are there times when you want to center your subject? Sure…if your artistic direction calls for something specific like that. There is no problem there at all. However, you should not consistently center everything in every shot of your film. It will look strange.  My challenge here is for you to put on your favorite movie and sit down with a pad of paper and a pencil. Take note of how the main subject in the scene is framed. Think of how things are framed when someone is walking or running. How are they framed when talking to someone? How are they framed when looking at something? How is the landscape framed? How is the airplane or the car framed in relation to the direction it is travelling?
I think you will be surprised to note that most things are never centered. Even things you think are centered are usually positioned in the upper-center quadrant –not the dead center….like a center shot of a person. They may be centered in the shot, but their face (the area of emphasis) is actually located towards the upper-center area. You may think that the shot of a sunrise or the ocean is centered, but the horizon is actually positioned in either the upper or lower thirds of the screen. Go ahead. Give it a shot and see what you find out. Another post deals with different camera shots. Be sure to check it out.
0 Comments
Your comment will be posted after it is approved.
Leave a Reply. |


Categories
All
Archives |
 RSS Feed
